Traps and Snares in the Wilderness
This topic is closely related to Food in the Wilderness page, but since there is a lot to learn we decided to place it on its own page.
For a survivor lost in the wilderness, trapping or snaring wild preys is a good survival technique which can help you get the essential food you need and avoid starvation. Several well-placed traps have the potential to catch much more preys than a man with a rifle is likely to shoot. To be effective with any type of trap or snare, you must: Be familiar with the species of animal you intend to catch, be capable of constructing a proper trap, not alarm the prey by leaving signs of your presence.
There are no catchall traps you can set for all animals. You must determine what species are in a given
area and set your traps specifically with those animals in mind. Look for the following: runs and trails, tracks, droppings, chewed or rubbed vegetation, nesting or roosting sites, feeding and watering areas.
How to Set Traps and Snares
Before learning the many methods of setting traps and snares at the second half of this page, you need to know where to put the traps. Position your traps and snares where there is proof that animals pass through. You must determine if it is a "run" or a "trail." A trail will show signs of use by several species and will be rather distinct. A run is usually smaller and less distinct and will only contain signs of one species. You may construct a perfect snare, but it will not catch anything if haphazardly placed in the woods. Animals have bedding areas, waterholes, and feeding areas with trails leading from one to another. You must place snares and traps around these areas to be effective.
It is equally important, not to create a disturbance that will alarm the animal and cause it to avoid the trap. Therefore, if you must dig, remove all fresh dirt from the area. Most animals will instinctively avoid a pitfall-type trap. Prepare the various parts of a trap or snare away from the site, carry them in, and set them up. Such actions make it easier to avoid disturbing the local vegetation, thereby alerting the prey. Do not use freshly cut, live vegetation to construct a trap or snare. Freshly cut vegetation will "bleed" sap that has an odor the prey will be able to smell. It is an alarm signal to the animal.
You must remove or mask the human scent on and around the trap you set. Although birds do not have a developed sense of smell, nearly all mammals depend on smell even more than on sight. Even the slightest human scent on a trap will alarm the prey and cause it to avoid the area. Actually removing the scent from a trap is difficult but masking it is relatively easy. Use the fluid from the gall and urine bladders of previous kills. Do not use human urine. Mud, particularly from an area with plenty of rotting vegetation, is also good. Use it to coat your hands when handling the trap and to coat the trap when setting it. In nearly all parts of the world, animals know the smell of burned vegetation and smoke. It is only when a fire is actually burning that they become alarmed. Therefore, smoking the trap parts is an effective means to mask your scent. If one of the above techniques is not practical, and if time permits, allow a trap to weather for a few days and then set it. Do not handle a trap while it is weathering. When you position the trap, camouflage it as naturally as possible to prevent to avoid alarming the prey.
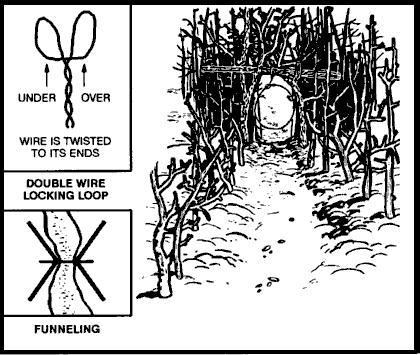
Traps or snares placed on a trail or run should use channelization. To build a channel, construct a funnel-shaped barrier extending from the sides of the trail toward the trap, with the narrowest part nearest the trap. Channelization should be inconspicuous to avoid alerting the prey. As the animal gets to the trap, it cannot turn left or right and continues into the trap. Few wild animals will back up, preferring to face the direction of travel. Channelization does not have to be an impassable barrier. You only have to make it inconvenient for the animal to go over or through the barrier. For best effect, the channelization should reduce the trail's width to just slightly wider than the targeted animal's body. Maintain this constriction at least as far back from the trap as the animal's body length, then begin the widening toward the mouth of the funnel.
Use of Bait
Baiting a trap or snare increases your chances of catching an animal. When catching fish, you must bait
nearly all the devices. Success with an unbaited trap depends on its placement in a good location. A
baited trap can actually draw animals to it. The bait should be something the animal knows. This bait,
however, should not be so readily available in the immediate area that the animal can get it close by. For
example, baiting a trap with corn in the middle of a corn field would not be likely to work. Likewise, if corn
is not grown in the region, a corn-baited trap may arouse an animal's curiosity and keep it alerted while it
ponders the strange food. Under such circumstances it may not go for the bait. One bait that works well
on small mammals is the peanut butter from a meal. Salt is also a good bait.
When using such baits, scatter bits of it around the trap to give the prey a chance to sample it and
develop a craving for it. The animal will then overcome some of its caution before it gets to the trap.
If you set and bait a trap for one species but another species takes the bait without being caught, try to
determine what the animal was. Then set a proper trap for that animal, using the same bait.
Note: Once you have successfully trapped an animal, you will not only gain confidence in
your ability, you also will have resupplied yourself with bait for several more traps.
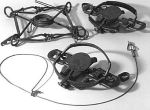
Trap and Snare Construction
Traps and snares crush, choke, hang, or entangle the prey. A single trap or snare will commonly
incorporate two or more of these principles. The mechanisms that provide power to the trap are almost
always very simple. The struggling victim, the force of gravity, or a bent sapling's tension provides the
power.
The heart of any trap or snare is the trigger. When planning a trap or snare, ask yourself how it should
affect the prey, what is the source of power, and what will be the most efficient trigger. Your answers will
help you devise a specific trap for a specific species. Traps are designed to catch and hold or to catch
and kill. Snares are traps that incorporate a noose to accomplish either function.
Simple Snare
A simple snare consists of a noose placed over a trail or den hole and attached to a firmly planted stake. If the noose is some type of cordage placed upright on a prey trail, use small twigs or blades of grass to hold it up. Filaments from spider webs are excellent for holding nooses open. Make sure the noose is large enough to pass freely over the animal's head. As the animal continues to move, the noose tightens around its neck. The more the animal struggles, the tighter the noose gets. This type of snare usually does not kill the animal. If you use cordage, it may loosen enough to slip off the animal's neck. Wire is therefore the best choice for a simple snare.
Drag Noose
Use a drag noose on an animal run. Place forked sticks on either side of the run and lay a sturdy crossmember across them. Tie the noose to the crossmember and hang it at a height above the animal's head. (Nooses designed to catch by the head should never be low enough for the prey to step into with a foot.) As the noose tightens around the animal's neck, the animal pulls the crossmember from the forked sticks and drags it along. The surrounding vegetation quickly catches the crossmember and the animal becomes entangled.
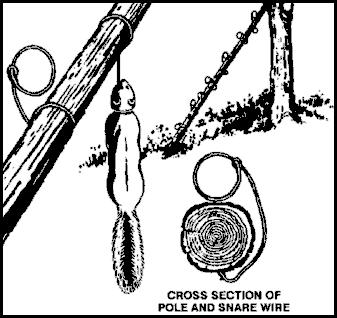
Twitch-Up Snare
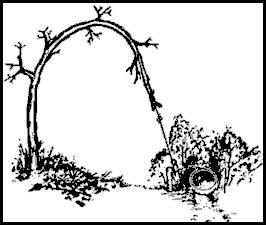
A simple twitch-up snare uses two forked sticks, each with a long and short leg. Bend the twitch-up and mark the trail below it. Drive the long leg of one forked stick firmly into the ground at that point. Ensure the cut on the short leg of this stick is parallel to the ground. Tie the long leg of the remaining forked stick to a piece of cordage secured to the twitch-up. Cut the short leg so that it catches on the short leg of the other forked stick. Extend a noose over the trail. Set the trap by bending the twitch-up and engaging the short legs of the forked sticks. When an animal catches its head in the noose, it pulls the forked sticks apart, allowing the twitch-up to spring up and hang the prey. Note: Do not use green sticks for the trigger. The sap that oozes out could glue them together.
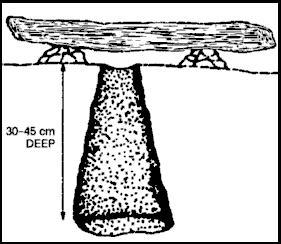
Bottle Trap
A bottle trap is a simple trap for mice and voles. Dig a hole 30 to 45 centimeters deep that is wider at the bottom than at the top. Make the top of the hole as small as possible. Place a piece of bark or wood over the hole with small stones under it to hold it up 2.5 to 5 centimeters off the ground. Mice or voles will hide under the cover to escape danger and fall into the hole. They cannot climb out because of the wall's backward slope. Use caution when checking this trap; it is an excellent hiding place for snakes.
Squirrel Pole
A squirrel pole is a long pole placed against a tree in an area showing a lot of squirrel activity. Place several wire nooses along the top and sides of the pole so that a squirrel trying to go up or down the pole will have to pass through one or more of them. Position the nooses (5 to 6 centimeters in diameter) about 2.5 centimeters off the pole. Place the top and bottom wire nooses 45 centimeters from the top and bottom of the pole to prevent the squirrel from getting its feet on a solid surface. If this happens, the squirrel will chew through the wire. Squirrels are naturally curious. After an initial period of caution, they will try to go up or down the pole and will get caught in a noose. The struggling animal will soon fall from the pole and strangle. Other squirrels will soon follow and, in this way, you can catch several squirrels. You can emplace multiple poles to increase the catch.
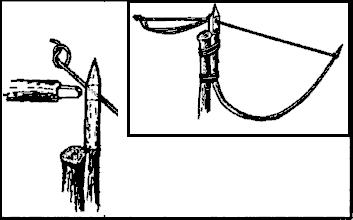
Ojibwa Bird Pole
An Ojibwa bird pole is a snare used by native Americans for centuries. To be effective, place it in a relatively open area away from tall trees. For best results, pick a spot near feeding areas, dusting areas, or watering holes. Cut a pole 1.8 to 2.1 meters long and trim away all limbs and foliage. Do not use resinous wood such as pine. Sharpen the upper end to a point, then drill a small diameter hole 5 to 7.5 centimeters down from the top. Cut a small stick 10 to 15 centimeters long and shape one end so that it will almost fit into the hole. This is the perch. Plant the long pole in the ground with the pointed end up. Tie a small weight, about equal to the weight of the targeted species, to a length of cordage. Pass the free end of the cordage through the hole, and tie a slip noose that covers the perch. Tie a single overhand knot in the cordage and place the perch against the hole. Allow the cordage to slip through the hole until the overhand knot rests against the pole and the top of the perch. The tension of the overhand knot against the pole and perch will hold the perch in position. Spread the noose over the perch, ensuring it covers the perch and drapes over on both sides. Most birds prefer to rest on something above ground and will land on the perch. As soon as the bird lands, the perch will fall, releasing the over-hand knot and allowing the weight to drop. The noose will tighten around the bird's feet, capturing it. If the weight is too heavy, it will cut the bird's feet off, allowing it to escape.
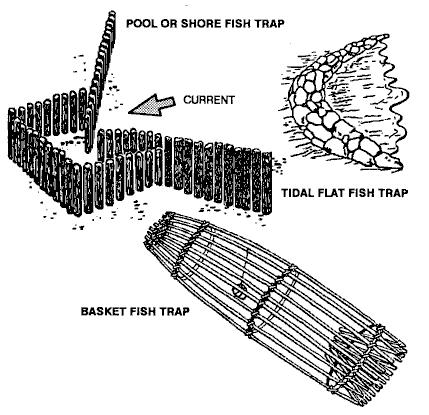
Fish Traps
You may trap fish using several methods. Fish baskets are one method. You construct
them by lashing several sticks together with vines into a funnel shape. You close the top, leaving a hole
large enough for the fish to swim through.
You can also use traps to catch saltwater fish, as schools regularly approach the shore with the incoming
tide and often move parallel to the shore. Pick a location at high tide and build the trap at low tide. On
rocky shores, use natural rock pools. On coral islands, use natural pools on the surface of reefs by
blocking the openings as the tide recedes. On sandy shores, use sandbars and the ditches they enclose.
Build the trap as a low stone wall extending outward into the water and forming an angle with the shore.
More information: We hope this page was helpful and provided you with some survival techniques on how to set traps and snares in the wilderness. Check out our main page for more survival scenarios here Survival Guide, knowledge is light, and knowledge can save your life. Make sure you do your best to know what to do in a survival situation and then hope for the best.
Related Articles to Traps and Snares in the Wilderness
- Water in the Wilderness
- Food in the Wilderness
- Fire in the Wilderness
- Survival Kit
- Survival Checklist